
Finally - the finishing touches are on, after a few years of being "mostly done". A crafty girl I worked with back in 2007 (right after son #1 was born) coordinated an I Spy Quilt share. Of course I signed up for it - it was easy . . . make 30 squares of all the same block. Turn them in and you get 29 blocks back that are all different. Sew them together with some borders and ta da, you have a super cute I Spy Quilt. 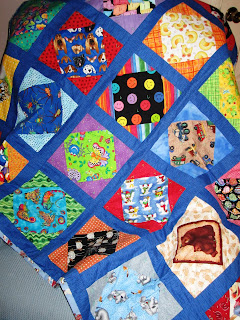 So easy and fun, that I made another one in 2008 for son #2.
  This is one of my favorite squares - bug jars.

So easy and fun, that I made another one in 2008 for son #2. This is one of my favorite squares - bug jars. Well I had intended on making quilt labels for each quilt - and I actually finished them a few months ago. I had just never gotten around to sewing the labels on the actual quilts until last weekend. Finally - all done!
 The directions that my friend gave us for making the squares were easy and fast. I thought I would share them here.
 The directions that my friend gave us for making the squares were easy and fast. I thought I would share them here.
 I Spy Quilt
For each square you will need two 6 1/2" squares of fabric. One fabric should be the "I Spy" fabric that has something a child can "find" in it. I personally like fabrics that aren't too busy and that have mostly one or two kinds of items. The second fabric should be a coordinating print without any "I Spy" items in it (I like plain prints with dots, swirlys, lines, etc to give it some texture without taking away from the first fabric). 
On the wrong side of the coordinating print (not the I Spy print), draw two lines to form an "X" from one corner to the opposite corner, and then connecting the remaining two corners. I used a pencil here, but on darker fabrics I like using chalk or a lighter fabric marker. Then put the two fabrics right sides together and sew all the way around all four sides using 1/4" seams. Do not leave an opening.
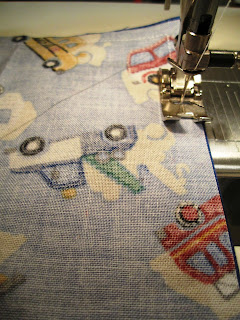 Here is what your seam should look like after sewing - no opening, just a 1/4" seam all the way around.
 Now, with some sharp scissors, starting in the middle of your "X", cut on each of the lines all the way to the seams in each corner.
  Open your four flaps completely and press the fabrics.
Then put the two fabrics right sides together and sew all the way around all four sides using 1/4" seams. Do not leave an opening. Here is what your seam should look like after sewing - no opening, just a 1/4" seam all the way around.Now, with some sharp scissors, starting in the middle of your "X", cut on each of the lines all the way to the seams in each corner. Open your four flaps completely and press the fabrics. (And I just realized that I drew my "X" on the I Spy print rather than the coordinating print. The car fabric should have ended up in the middle with the dark blue fabric in the corners. Ha! Just use your imaginations here!) When you have 30 different blocks sewn, size them up, trimming off the little triangles at each seam intersection. Sew them together with borders (or not) of your choice. I used 2" borders between each block. Quilt and bind as you like.
When you have 30 different blocks sewn, size them up, trimming off the little triangles at each seam intersection. Sew them together with borders (or not) of your choice. I used 2" borders between each block. Quilt and bind as you like.Here is another finished block with the I Spy fabric and the coordinating fabric in the right places. Yes, it was very late at night when I sewed the sample block above - I tend to make stupid mistakes when I'm tired. But you get the right idea.
Really - a very easy way to mass produce I Spy blocks!


 Husband thinks they should be lower and touchable to be quality learning tools (ah, ever the elementary teacher he is!). I like them just as they are - cute art for a little guy's room.


 The best part about this little project is that I have a little chair from my childhood in my garage that needs to be stripped and repainted. It will also need a cushion. And now I'm motivated to do it!
 You gotta love these - I've made a million over the years. No-sew fleece blankets. When son #1 was born, a lady I work with gave me a no-sew flecce blanket with teddy bears on it. It is son #1's favorite blanket still to this day (we call it his teddy
  These are really so easy - trim off the selvage edges. Then on the short edges (non-selvage) cut strips every inch all the way along the edge. I find that strips around 4 - 4 1/2 inches long work the best for me. And a quick shout out for rotary cutters and mats - what ever did we do without these amazing and wonderful tools!


