
I was recently wandering the rows of a great local craft fair and found some really cute burlap tote bags. So I bought one and had been thinking about making one. Then I ran across a bolt of black burlap at the fabric store and thought . . . hum, Halloween? Of course a burlap bag really needs to be lined which sounds a little scary. After a few tips from various blogs on how to make easy lined tote bags I thought I'd try my hand at one. Really easy, really fast . . . my only tip is - with the loose weave of the burlap, use fairly big seams so the seams don't pull apart. My pictures really don't do this bag justice - the Halloween fabric and orange inside pocket fabric are fun sparkly fabrics and the burlap is not the dull black it appears in the photos. Use your imagination. Here's how I made the bag:
Here's how I made the bag:Halloween Burlap Tote Bag
You will need:
Black Burlap - cut 2 pieces (mine were about 14" x 17")
Top Border fabric - cut 2 pieces approximately 6" x 17"
(Since I was using a border piece I made it as tall as the border I wanted and then of course cut it the same width as your burlap.)
Handle fabric - cut 2 pieces approximately 5" x 22"
Inside Pocket fabric - cut 2 pieces 7" x 8"
Lining fabric - cut 2 pieces the finished dimensions of the burlap and top border piece.
(My pocket fabric was flimsy, so I also cut a piece of fusible interfacing the same size and ironed that to the wrong side of one pocket piece to give it some sturdiness.)
With right sides together, sew each border piece to the top of a burlap piece. My seam was fairly narrow to allow as much of the fabric print to show as I could, but I would definitely advise a wider seam!
On the right side, top stitch on the each border fabrics. Using a finished outside piece as your pattern, cut 2 lining pieces.
For the pocket piece, put right sides together and sew the top seam of the pocket. Fold over so wrong sides are together and baste the other three sides together. With a hot iron, press the sides and bottom in about 1/2 inch all the way around. Top stitch the top of the pocket.
Sew the pocket on to the right side of one of the lining pieces. Be sure to center the pocket side to side. I put mine about 4 inches from the bottom of the lining piece. Sew around the sides and bottom of the pocket. With right sides together, sew the two lining pieces together. Be sure to leave about a 4" opening in the center bottom seam (for turning the tote bag after you sew it all together). Turn the lining so the right sides are out.
 Place the two outside pieces right sides together and sew completely around the sides and bottom.
With right sides together, sew the two lining pieces together. Be sure to leave about a 4" opening in the center bottom seam (for turning the tote bag after you sew it all together). Turn the lining so the right sides are out.Place the two outside pieces right sides together and sew completely around the sides and bottom. To "box" the corners, take your lining piece and pinch the bottom and side seams together. Keep your side and bottom seams lined up. Measure up from the corner until you have a line that is 3" long. Sew along that line. Do the same for the other corner. Cut away the little triangle that is leftover. Now do the exact same "corner boxing" to both corners of the outside piece. 
With your two handle pieces, fold each in half lengthwise and iron the fold. Open the pieces back up so you can see the crease.
 Now iron each edge in so it meets the original center crease.
 Finally fold the piece in half (on the original crease line). Top stitch down both the folded and "open" side of the handles.
  Place a handle piece on the right side of the lining. I placed mine about 3 - 3 1/2" in from each side seam. One handle should be on each side of the lining. I just pinned the handles in place, matching the raw edge of the handle pieces with the top of the lining. Push the bulk of the handle down so it won't get caught in the top seam that you are about to sew.
 Now with right sides together, put the lining piece (right side out) inside the outside piece (right side in). Line up the two top edges. Sew using a generous seam (1/2") all the way around the top. I reinforced the handle pieces well to give them some strength.
 Turn the entire piece right side out using that 4" opening that you left in the bottom of the lining piece. Be sure to poke out all your corners. Close the opening in the bottom of the lining by sewing it closed. Nobody will see this so no fancy hidden stitching needs to be done.
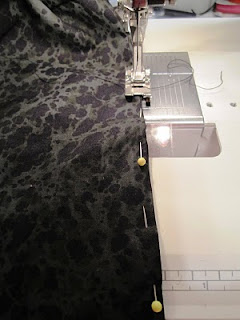 Now push the lining piece back down inside the tote bag. Make sure your bottom and corners between the lining and the outside piece all match up nicely. Iron the top so that everything lies flat and even. Top stitch around the very top of the bag about 1/8 inch from the very top.
 You're done. Here is a picture of the inside of the bag showing the pocket. My lining and handle fabric was really just various shades of black - I'm not sure why it looks green in these pictures.
 And here is the finished bag. Perfect for carrying a couple of diapers and a package of wipes, or some soccer games snacks and water bottles, or some treats to a Halloween party . . . or whatever.
Now iron each edge in so it meets the original center crease.Finally fold the piece in half (on the original crease line). Top stitch down both the folded and "open" side of the handles. Place a handle piece on the right side of the lining. I placed mine about 3 - 3 1/2" in from each side seam. One handle should be on each side of the lining. I just pinned the handles in place, matching the raw edge of the handle pieces with the top of the lining. Push the bulk of the handle down so it won't get caught in the top seam that you are about to sew.Now with right sides together, put the lining piece (right side out) inside the outside piece (right side in). Line up the two top edges. Sew using a generous seam (1/2") all the way around the top. I reinforced the handle pieces well to give them some strength.Turn the entire piece right side out using that 4" opening that you left in the bottom of the lining piece. Be sure to poke out all your corners. Close the opening in the bottom of the lining by sewing it closed. Nobody will see this so no fancy hidden stitching needs to be done.Now push the lining piece back down inside the tote bag. Make sure your bottom and corners between the lining and the outside piece all match up nicely. Iron the top so that everything lies flat and even. Top stitch around the very top of the bag about 1/8 inch from the very top.You're done. Here is a picture of the inside of the bag showing the pocket. My lining and handle fabric was really just various shades of black - I'm not sure why it looks green in these pictures.And here is the finished bag. Perfect for carrying a couple of diapers and a package of wipes, or some soccer games snacks and water bottles, or some treats to a Halloween party . . . or whatever. 


No comments:
Post a Comment