First of all - I apologize in advance for the poor lighting in some of these pictures - I only get crafting time at night and the light is difficult for good picture taking.
Ok - now to something I've been wanting to blog about for a long time and I think I have the energy tonight to start it. Before son #1 was born I really wanted to make a quiet book. I have very fond memories of sitting in church when I was a child with a quiet book that my grandmother handmade for us. We loved that book! I found a quiet book class at one of my local craft/fabric shops and of course signed right up for it. I was glad that I did! Their way of putting the pages together was fabulous and I have been able to jump off from their ideas and add lots of new pages and details to "my" book. It's still a work in progress - I have lots of ideas for additional pages . . . some are even sketched out or started. One day soon, I might have some more time . . .
Anyway - another important note - many of these ideas are not my own. Some are straight from the ladies that taught the class, some are from other idea books I've come across, some are from blogs I've seen on the web, a few are copies of pages that my grandmother made for us, and some are actually my own ideas.
So with all that in mind - I present "my" Quiet Book. My sons love this book just like I hoped that they would. I plan on posting it all over the next few days (probably 3 posts total) to get it all in. Stay tuned for more.
This is the front of the book. I didn't want to put the pages in a hard binder so I created my own soft, quilted "binder". I found some sky fabric at Joann's along with a piece of airplane fabric. I used the sky to make the book and then fussy cut some airplanes, rockets and helicopters out and then quilted them on the book. I used ribbon to tie it closed and now wish that I hadn't. In fact, after using it again today at church, I think I'm going to open those seams up and take the ribbon out. I'm thinking about adding in a flap with
velcro closures. Here is the
front of the book.

Here is the
inside front cover.

The inside back cover.

And the
back.

I really didn't have a pattern to follow when I made the cover. But I knew that I wanted to be able to put pages in and take pages out. So I used large binder rings from the office supply store along with some thick/heavy ribbon. I sewed that ribbon down a few times along the spine, jumping my needle over the rings when I came to them. I really do like being able to trade out pages from time to time as their skills grow and as they get bored with certain pages.

Here's just a taste of the finished pages - again I'll post the rest over the next two posts.
In the class they recommended that we use heavy weight stabilizer (like
Pellon 65) for our pages. It is stiff and you can color and sew on it very easily. I used colored pencils to add the color. Sharpie pens (in various thicknesses) are used to add the black writing and lines - super easy! Each page is made on its own and then two pages are sewn wrong sides together. I run my pinking rotary cutter around the edges to square it all up and then use my grommet tool to put the three grommets in. I love this touch because it is nearly impossible to ruin a page at the holes which is usually a weak spot. Another important note - I found it useful to try to put the same level of skill pages back to back so that as I add them in and out of my book, easier or harder pages made sense.
Stoplight - the red, yellow, and green circles are
velcroed on.
 Seashell Lacing
 - this is one of son #2's current favorite pages. He loves putting the shoelace through the holes in the shells and is quite proud of himself each time he finishes a shell. The shells are colored with pencils and laminated for durability. The top of the bucket is open so that everything for this page can be stored right inside.
 Apple Tree
 - the apples snap on to the page and can be put in the basket at the bottom. I made the basket out of the
Pellon since I saw that the felt would stretch and even droop ever so slightly. The grass is cut out of felt and sewn to the page - kind of a three dimensional effect.
 Boat
Boat - kind of like a puzzle or picture that they can
velcro off and on to the page. Another hint is to use invisible thread in both your needle and bobbin for sewing the
velcro on so that you don't have to keep changing out the thread color for each piece.

More to follow . . .

 #2 - Valentine's Day Countdown
 #3 - Swaddle Baby Blanket
 #4 - Caramel Marshmallow Pops

 House - the idea here was to laminate pictures of our family (immediate and extended) and put inside the house for them to look at. However, that part never happened. Right now the house serves as storage for the X's and

 Flowers - another sentimental page. These flowers snap off and on and can be put inside the flower pot (at the top edge). A few of these shapes were taken from my grandmother's book.
 Laundry - tiny clothes pins can be found at most craft stores. The clothes are made with double layer fabric bonded together for a little extra stiffness. The basket is made from
  Weaving - this is a difficult skill level so the boys haven't seen this page yet. Simple strips of felt sewn down for weaving.
  Braiding - this is another high skill level page that backs up to the weaving page. I'm relatively sure my boys won't care about learning to braid hair, but I do like this page. The top part of the hair is brown felt sewn down with the strands of yarn caught in the seams.
  And there we have it - "My" Quiet Book. Like everyone says - these are a labor of love. But so worth it. I have a pile of pages cut out and ready to make some new pages. Pages of patterns and hand drawn sketches are next to them waiting for attention. I hope to get to some new pages within the next few months . . . or at least before my boys head off to college. I'll post here if/when more pages are done. Feel free to comment if you have questions.
 Shapes - these shapes are buttoned on to the page. Son #1 has just mastered buttoning.
 Peek-A-Boo - this page came from the class I took. But I remember having a page similar to this in my growing-up quiet book. The hands are sewn on to the page at the "wrist". That way the hands can be flopped up and down to reveal the picture. Son #2 still yells out Peek-A-Boo whenever he plays with this page. We're working on quiet voices at church still, obviously!
 Counting Bugs - this was fun page from my class. The bug net is netting sewn on to a small embroidery hoop and then the hoop is partially sewn on to the page so that little hands can reach in and out of the net. We have lots of bugs (colored
  Clock - this was a page I really wanted to do, although neither of my kids is currently worried about telling time. Besides, everything is digital now isn't it? Anyway . . . another easy page with a brad in the center so that the hour and minute hands can independently move on the clock.
 The Pocket - colored felt with an opening at the top of the pocket part and a button flap . . . super easy. We are currently storing a pad of paper and golf pencil inside for drawing.
 Tic
Tic  Train - this is probably my most sentimental page. This is a nearly exact copy of a page from my grandmother's book. My boys love trains so this is a huge favorite for them too. The pieces snap on and off. I love to put the pieces in the wrong order - they get after me about the engine and cars and smoke being in the "right" places! This page always makes me think of grandma C.


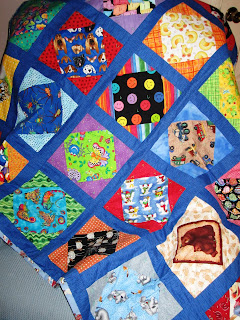 So easy and fun, that I made another one in 2008 for son #2.
  This is one of my favorite squares - bug jars.


 Then put the two fabrics right sides together and sew all the way around all four sides using 1/4" seams. Do not leave an opening.
 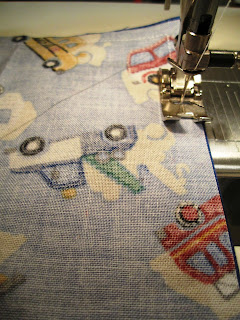 Here is what your seam should look like after sewing - no opening, just a 1/4" seam all the way around.
 Now, with some sharp scissors, starting in the middle of your "X", cut on each of the lines all the way to the seams in each corner.
  Open your four flaps completely and press the fabrics.

 Husband thinks they should be lower and touchable to be quality learning tools (ah, ever the elementary teacher he is!). I like them just as they are - cute art for a little guy's room.


