Showing posts with label quilt. Show all posts

Sunday, September 15, 2013

A Quilt for My Little Camper

Well son #2 had to grow up, at least a little bit, some time.  This summer we finally took the leap and got him out of his toddler bed into a "big boy" bed. And I've struggled.  Not with the big boy bed part, but with the "how to decorate his room" part.  Son #2 is not picky . . . at all.  Son #1 was a tad bit picky but luckily he went a long with my insightful guidance and agreed to decorate his room in an outdoors/wildlife theme.  We found the most amazing bedding that really inspired the theme at Target quite a while ago.  And knowing that son #2 would someday need his room to be more grown up, I've been on the lookout for something just as cute for him ever since.  Though Target discontinued carrying the bedding line I got for son #1, I was able to find various sets on eBay and I thought about just getting son #2 matching bedding - since there was really absolutely nothing else nearly as cute.  But as cute as it was, I couldn't talk myself into giving them matching bedrooms.  They are completely different people and I want them to each have their own identify.  I wouldn't want son #2 to feel like he is just a miniature son #1.
 
So when we took out the toddler bed and brought in the beautiful, gently used, Pine bed that I found in the local online classifieds, it was time to get serious.  Son #2 and I spent hours looking online at all the bedding options that would steer his new room theme.  Nothing worked.  OK, remember he's not all that picky - so let's just say it - nothing worked for me. 
 
Then, a started seeing a vision.  We are all about the outdoors and wildlife around here.  And some of the wall decorations that will stay in his room are of that same genre.  I remembered a cute line of boy fabric that had been out but wasn't sure if I could still find it.  I could and I managed to put together various cuts from all across the internet.  I drew out a quilt for my little guy along with a pieced backing and a matching curtain - thank you to whomever invented graph paper.  Quilting math is truly far more difficult that Calculus - and I would know, I took two years of Calculus! 
 
Anyway, the fabric arrived, I triple checked my quilt math, and finally I started cutting all the pieces.  It always makes me laugh just a little when I'm piecing a quilt - you buy this great fabric, then you cut it up into little pieces and sew it all back together again.  Fortunately, my mom happened to be in town over Labor day weekend and I talked her in to manning the ironing board.  I sewed and pieced and threw chunks of fabric upstairs for her to iron.  We had the top pieced in under 24 hours.  I had done the curtain a few weeks ago, just to see if I liked it.  I finally finished the pieced back this weekend and now, it's all ready to take to the long-arm quilter.  Son #2's camping quilt is just about ready to go into his camping themed room.
 
I know the pictures are awful - at night, in the house.  But at least you can get the idea.  The cotton fabric is all Fox Trails from Riley Blake.  It's an adorable line that I just love.  Husband kept saying it was a little girly for his tastes . . . until I got the lightweight corduroy and lightweight denim borders added.  That helped "man it up!"  The colors are light blues, light greens, creams, and tans.  It really is great fabric!

 This is a little better view of the top.  The coordinating fabrics includes some plaids, argyles, stars, and dots. 

And here's a shot of the back.  It's more of the denim and corduroy with some strips of cotton pieced in.  
 
I'll drop it at the quilter's soon and after I get it back and get it bound, I'll show the finished product.  There's starting to be a nip in the night air so it will be finished just in time to keep my little camper warm.
post signature

Sunday, July 7, 2013

Window Quilt

I saw this fantastic idea a few months back over at That's My Letter's Blog.  I knew I had to try it out and finally got it finished this week. 

I found this great six paned window from North Carolina.  It is over 100 years old and it has some amazing old square headed nails.  My husband carefully stripped the old flaky paint off and sanded it down.  He painted it a light coat of flat white paint and then I distressed the paint with some sandpaper.  (Yes, I had the easy job.) 

Six mini quilts later and here you have my version of a Window Quilt.  I gave it away for a family reunion auction this weekend.  I was tempted to bid on it so I could have it but I let it go, knowing that I could make another just for myself. 

post signature

Friday, May 18, 2012

Tutorials I Love

Since this blog is for me to keep my crafting life organized, I decided to post a tutorial that I found that I think is great. I want to be able to find it later . . . When I really need it most. And I'm always so impressed by the time and energy people put into tutorials. You really can learn almost anything you need online. I always seem to find just what I need on the Internet! Any hoo . . . This great tutorial is from Red Pepper Quilts and it is How to Machine Bind a Quilt. I have a couple of quilts waiting for their binding. I've tried machine binding once before and wasn't especially happy with the results. I think I might just give it a go again with this tute at the ready.

post signature

Sunday, July 10, 2011

I'm Yo Yo'ing Right Along

Ok, so I might be a little off the pace set over at Sew Take A Hike, but I am definately rolling along. This little project has been good for me to take with me where ever we go and I can get them done quickly and easily. People continue to tell me they think I'm crazy, but I'm excited to see the final project. Only 887 more to go . . . maybe I am crazy!I've been stocking up on fabric (as if I really need any more!) and I have some projects ready to go here as soon as I make some time. Stay tuned!
post signature

Monday, May 23, 2011

Check . . . and Check!

I'm a list girl - always have been . . . always will be. But for me it's a good thing. I love to make a list and check things off as I accomplish them. So for this week, call it check and check!


1. Fabric bookmarks - these are still my favorite fabric bookmark pattern. I've made a few already and whipped these up yesterday for teacher gifts for the end of school. Little Birdie Secrets has a great tutorial for these on her blog. Fast . . . easy . . . and very cute!

2. Charm pack baby quilt - And the top is finally finished. Cluck Cluck Sew made hers a little while back and I wanted to whip one up. Now that I finally got over not having every little intersection perfectly aligned, I think it looks great.The flower was fun to work up and create. I think I'm going to try machine quilting this one on my own. I've been working on piecing the back this afternoon. More to come!

Here is the next project I have in mind for this week . . . a new summer tote bag from Noodlehead. Here is her version. I have some perfect scraps waiting to be used for just this bag. And for some reason I feel some pom-poms coming on for this one - we'll see.


post signature

Thursday, January 6, 2011

I Spy Quilt

Finally - the finishing touches are on, after a few years of being "mostly done". A crafty girl I worked with back in 2007 (right after son #1 was born) coordinated an I Spy Quilt share. Of course I signed up for it - it was easy . . . make 30 squares of all the same block. Turn them in and you get 29 blocks back that are all different. Sew them together with some borders and ta da, you have a super cute I Spy Quilt. 
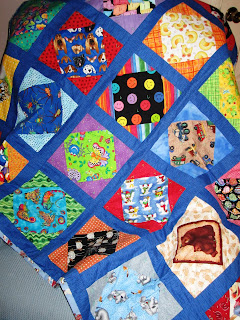
So easy and fun, that I made another one in 2008 for son #2. This is one of my favorite squares - bug jars.
Well I had intended on making quilt labels for each quilt - and I actually finished them a few months ago. I had just never gotten around to sewing the labels on the actual quilts until last weekend. Finally - all done! The directions that my friend gave us for making the squares were easy and fast. I thought I would share them here.
I Spy Quilt
For each square you will need two 6 1/2" squares of fabric. One fabric should be the "I Spy" fabric that has something a child can "find" in it. I personally like fabrics that aren't too busy and that have mostly one or two kinds of items. The second fabric should be a coordinating print without any "I Spy" items in it (I like plain prints with dots, swirlys, lines, etc to give it some texture without taking away from the first fabric).
On the wrong side of the coordinating print (not the I Spy print), draw two lines to form an "X" from one corner to the opposite corner, and then connecting the remaining two corners. I used a pencil here, but on darker fabrics I like using chalk or a lighter fabric marker.Then put the two fabrics right sides together and sew all the way around all four sides using 1/4" seams. Do not leave an opening.
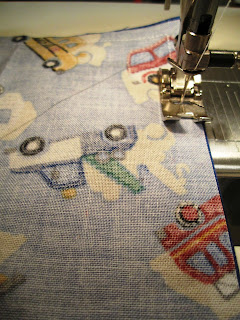
Here is what your seam should look like after sewing - no opening, just a 1/4" seam all the way around.Now, with some sharp scissors, starting in the middle of your "X", cut on each of the lines all the way to the seams in each corner. Open your four flaps completely and press the fabrics.
(And I just realized that I drew my "X" on the I Spy print rather than the coordinating print. The car fabric should have ended up in the middle with the dark blue fabric in the corners. Ha! Just use your imaginations here!)When you have 30 different blocks sewn, size them up, trimming off the little triangles at each seam intersection. Sew them together with borders (or not) of your choice. I used 2" borders between each block. Quilt and bind as you like.
Here is another finished block with the I Spy fabric and the coordinating fabric in the right places. Yes, it was very late at night when I sewed the sample block above - I tend to make stupid mistakes when I'm tired. But you get the right idea.
Really - a very easy way to mass produce I Spy blocks!

Sunday, January 2, 2011

Moose Crossing & Jewel Basin Wall Hangings

A few years ago I took a class at a local quilt shop and made this lovely McKenna Ryan designed quilted wall hanging. This is Moose Crossing and it's been hanging in my family room since then. I love looking at it!
Soon afterwards, I bought more of her patterns (she has a quilt shop in WA and still designs incredible outdoorsy type quilts) and made another - Jewel Basin. This one hung in my family room too until I took it down to replace it with a Tom Mangelson photograph of the Tetons in Wyoming. This got rolled up and stored . . . and I always felt badly that it wasn't being displayed. Well it finally has a home - son #1's bedroom. We just redid his bedroom - moving him up to a twin sized log bed with bear bedding. This now proudly hangs on his wall above the log bed and he loves it almost as much as I do. I might have to make another now!

Saturday, August 28, 2010

The Finished Quilt

A little time at the machine quilter's and a few minutes putting the binding on . . . . and at last, I have a finished Going-to-College quilt to give to my friend Madi. I hope she enjoys it . . . .
. . . . And that this quilt has a lot of stories to tell one day like mine does. Study hard and play hard, Madi!

Sunday, August 15, 2010

The Leaving-For-College Quilt

Many, many, many years ago when I left home for college, I brought with me a quilt that my grandmother had made for me. That quilt went everywhere with me . . . . my dorm room, picnics, camping, movies, sleepovers . . . literally everywhere! I loved that quilt . . . almost to the point that it is now unusable. The batting has started to peek through in spots. The edges are tattered and torn. The squares are coming undone. I really have loved that quilt.
I have a really great friend whose daughter is leaving for college this week. She's not going too far from home, but she is moving in to an apartment and starting her own life. I wanted to make a quilt for her to take with her. Of course I didn't have this idea until Tuesday night. I sat up for a few late hours drawing out my quilt idea on graph paper. The "quilt math" was pretty intense for a while - and then I had my yardage and layout ready to go. I was at the store the next afternoon picking up fabric in her favorite colors - orange and lime green. By Wednesday night I had everything cut and the first four rows sewn. Thursday night my friend and I went up to Park City for the night and I didn't sew at all. Friday night we came back to my house and sewed until about 1 a.m. By Saturday morning, the quilt top and a really fun pieced back was dropped off to the machine-quilter. It should be ready to pick up this week - a little bit of binding added and Madi should be ready to take it off to college with her this weekend. How's that for a quilt!
This is the quilt my Grandmother made for me. Some of the fabric was leftover from projects and clothes she sewed for us growing up. If this quilt could talk - I know it would have some stories to tell!
Here's the fabric I chose for Madi's quilt.
And here is the quilt top all pieced and ready to go. (The lighting wasn't very good in my family room at 1:00 a.m. on my phone camera.) It's a queen size quilt, so I kept the squares large. Some simple strip sewing and it came together just as I imagined. I'll post a picture after it is all bound and ready to give away.

Tuesday, May 11, 2010

Little Girl's Baby Blanket

I love to sew. I also believe that a new baby can never have too many blankets/quilts. So I often make blankets for my friends who are having babies. This is my most recent creation for a soon-to-arrive baby girl. I actually attempted to match fabrics on my own and while I don't think I "love" the results, they will work for now. Add to the blanket a super cute sun dress from Old Navy and I'll mail this off for the mom and new baby this week.